Behind the Lens: Creating Monts-déserts Nocturne
A behind-the-scenes look at photographing Acadia’s rugged coast under the Milky Way.
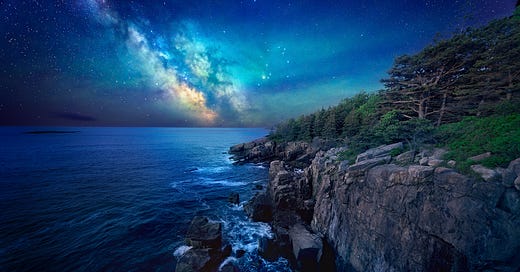
Most people who visit Acadia National Park only experience the rugged shores, the rocky outcroppings, and cliffs that seem to fall away beneath their feet. Then there are the hearty ones who venture out at morning twilight to watch as the sun rises over the Atlantic. But very few take the time to stand on the rocky shores of Mount Desert Island at night, gazing overhead into the cosmos. It is a unique experience, standing there in the dark. The waves continue to wash over the rocks, but when there’s no moon, it is difficult to see, so you rely on your hearing. You might also hear a buoy bell ringing in the distance, and possibly see the flash from Baker Island Lighthouse, sitting about 4 miles offshore. But when there is no moon, it is the best time to stargaze, but incredibly difficult to see anything else around you. There is very little light pollution in Acadia National Park, making it one of the best places to stargaze on the eastern seaboard. In fact, Acadia is in the process of becoming an International Dark Sky Park, certified by Dark Sky International.
Which brings me to the purpose of this post. Being just over 2 hours from Acadia gives me as many opportunities as I want to go and capture the night sky over some of the iconic landmarks in the park. This past Friday, I ventured up to Acadia with my son and stepson for some adventure under the stars. I had an image in mind from a spot along the Ocean Trail just north of Thunder Hole. With the moon not rising until 3am, the skies would be plenty dark.
My Process for Milky Way Landscapes
For me, most of my night sky landscapes are a two-part process. I’m not a fan of the images of the Milky Way where the foreground is just a black shape. I prefer to see some detail. For that reason, I prefer to capture the location during blue hour. For my image “Monts-déserts Nocturne”, I was hoping to be there for sunset and make several blue hour images. Unfortunately, I made one major error that delayed me, so I missed blue hour, arriving just as darkness fell.
Because of the error I required a new plan, so I set up where I had intended to, and began capturing night sky images. I waited about two hours until the Milky Way was in the position I wanted, and once it was, I put my camera in continuous drive mode, and locked the shutter button down on my remote, so the camera would just keep taking images. For this image, I let it take 18 images. The exposure was ISO 12800, f/2.8, 8 seconds.
After I had my primary image, I headed to a few other spots to see what I could make at those spots. Visiting the other locations kept us busy until about 2:30am. At that point, it was just over an hour and a half before civil twilight, so we drove back around to my initial location north of Thunder Hole, and waited. At 3:45am, I made my way back out to my spot and waited. Sunrise was at 4:48am, so I knew the light would begin coming up soon. I set up in the same spot I’d taken the Milky Way images from, and began to photograph. The tide was coming back in, so I knew I’d get some decent waves against the rocks. I took a lot of images, trying to ensure I got just the right water movement for the final image.
Once I was back home (after an awesome breakfast at Jordan’s in Bar Harbor, I got to work on putting together the image. First, I went through my many foreground images and selected one. Then I went to my Milky Way images, and pulled the 18 images I mentioned earlier. I then ran those 18 images through DXO PureRaw 4. I find PureRaw to do an outstanding job at reducing noise and improving shadow detail. Once those 18 images were processed in PureRaw, I opened them in Adobe Camera Raw, making some exposure and contrast adjustments. I then saved those images as tiff files. After that, I opened Starry Landscape Stacker, and imported the tiff files, stacked and aligned them, and saved the combined file as a tiff.
Next I open my foreground blue hour image. I made some adjustments in Camera Raw, including brightness and contrast adjustments, white balance, and clarity. From there I opened the file in Photoshop. Once in Photoshop, I selected the sky and created a mask from the selection, hiding the sky and keeping the foreground. I then opened the tiff of the stacked stars, and dropped that behind the foreground image. Considering the fact that I moved between making both images, they lined up pretty closely, so I only needed to do minimum work to blend the sky and foreground.
Once everything was blended together, I used a curves adjustment to match the foreground a bit more closely with the sky. Once satisfied that the image matched up well, I made my usual landscape adjustments. A little dodging and burning, some contrast adjustments, added some structure to the cliffs to bring out the details, and a slight Orton layer applied to areas in the distance. My final adjustments are a hue and saturation layer, and a final curves adjustment to finalize the contrast.
I realize this style of processing doesn’t appeal to everyone, and that’s fine. But this is the way I prefer to approach my night sky landscapes, and I thought I’d share my process. Maybe someone will find it useful.


Nicely done Rick!